AWS CloudFormation Configuration and Deployment
Perfect Assistant supports deployment of projects to Amazon Web Services through the CloudFormation stack template system. This provides a powerful mechanism for simultaneously deploying multiple projects along with supporting server applications and databases. This currently includes support for ElastiCache Redis instances as well as RDS based Postgres and MySQL.
AWS Tools Installation
Perfect Assistant uses the AWS command line tools to orchestrate deployments. If you already have the AWS command line tools installed on your machine and available in your $PATH, then Perfect Assistant will use that version and be able to take advantage of any existing configuration information such as IAM access keys, and preferred EC2 regions.
If the AWS command line tools are not installed, Perfect Assistant will prompt you to install them when you first open a CloudFormation deployment configuration. This prompt will automatically install a local copy of the AWS tools. The tools will be installed to "~/Library/Perfect/PerfectAssistant/aws/".
Getting Started
To begin, first create a new "Amazon Web Services: CloudFormation" deployment configuration from either the Index window templates area or from within a project's "Project Deployments" view. When a new CloudFormation deployment configuration is created it will appear in the Index window's "Deployments" list. Creating a new configuration will automatically open the configuration editor window where the deployment can be configured.
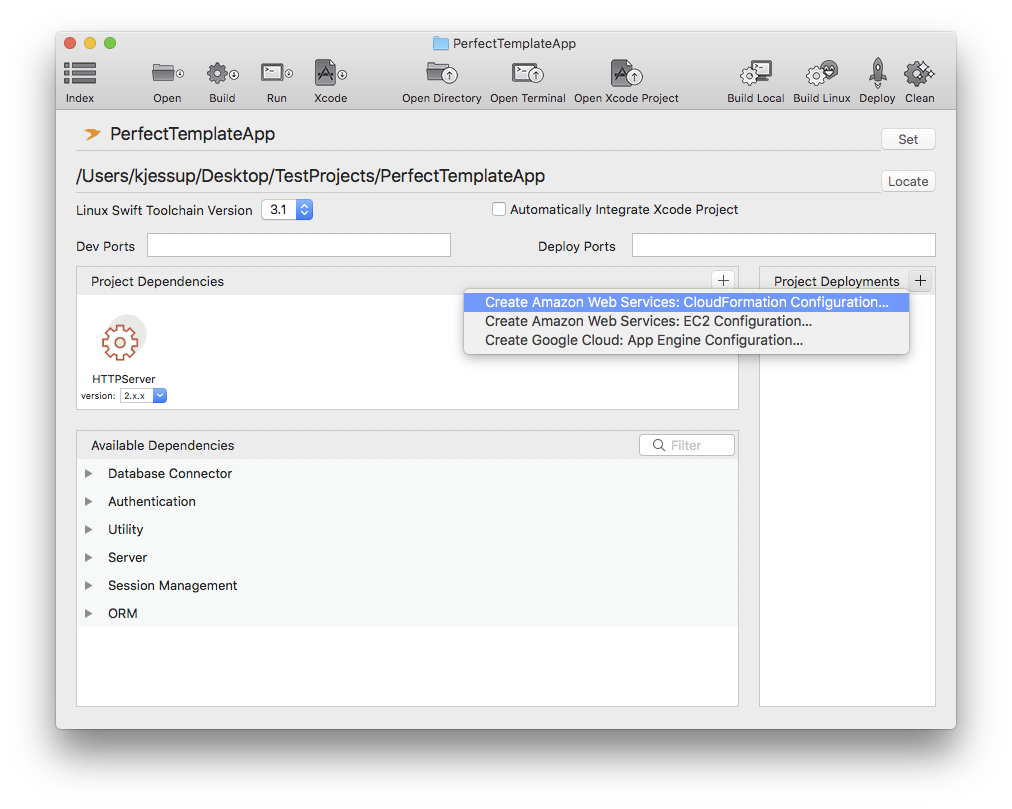
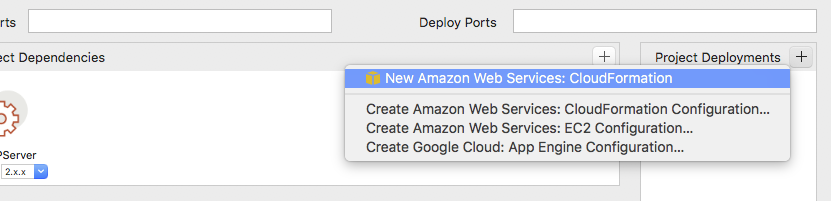
Option #1 Creating new configuration from Project Editor window. Choose from "Project Deployments" menu.

Option #2 Creating new configuration from Index window. Double-click deployment option.
Creating the new deployment configuration by choosing the Project Editor menu (option #1) will automatically associate the project with the configuration. A project can later be associated with an existing configuration from within the Project Editor window. Existing configurations will show up in the Project Deployments menu.
Associating a project with an existing deployment configuration.
After associating a project with a deployment configuration, or making any changes in the Project Editor, the changes must be saved (⌘-S) for them to take effect.
Once a new CloudFormation deployment configuration has been created and associated with at least one project, the configuration window should look something like the following:
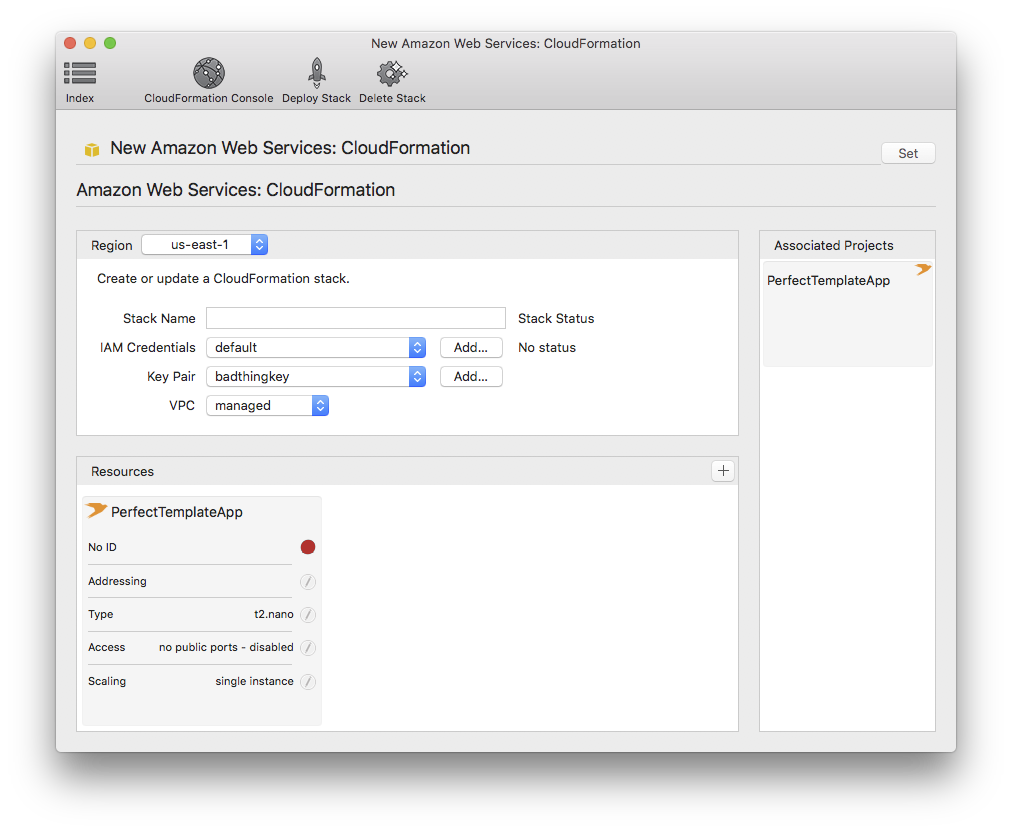
CloudFormation Deployment Configuration with associated project.
Settings
The configurable window toolbar permits quick access back to the Index window, as well as the ability to open the AWS CloudFormation management console in your browser, deploy, or delete (un-deploy) your stack.
After creating a new deployment configuration it is given a default generic name. Click the "Set" button to the right of the title to enable the text area in which you can assign it a new descriptive name. Press the enter key to provisionally commit the change. You must save the configuration (⌘-S) for any changes to be fully committed.
Below the title is the main settings view. In this view you can select the desired deployment region, enter a name for the stack, select or enter your IAM credentials and SSH key pair. Additionally, you can select the VPC to which the stack will be deployed.
The purpose of these settings are explained further here.
Region
The "Region" popup list presents all of the available AWS deployment regions. Changing the region may alter the list of available key pairs and VPCs. All deployments are region specific. If you need to deploy to multiple regions it is advised that you create additional deployment configurations and edit them appropriately.
Stack Name
A stack name is required for deployment. A stack name is simply a label used to refer to whatever resources are deployed as part of the stack. Stack names must be unique for your account in the currently selected region. Once a stack is deployed, changing the stack name will cause it to be treated as a different stack altogether. A descriptive stack name which will help you identify associated resources is advised.
IAM Credentials
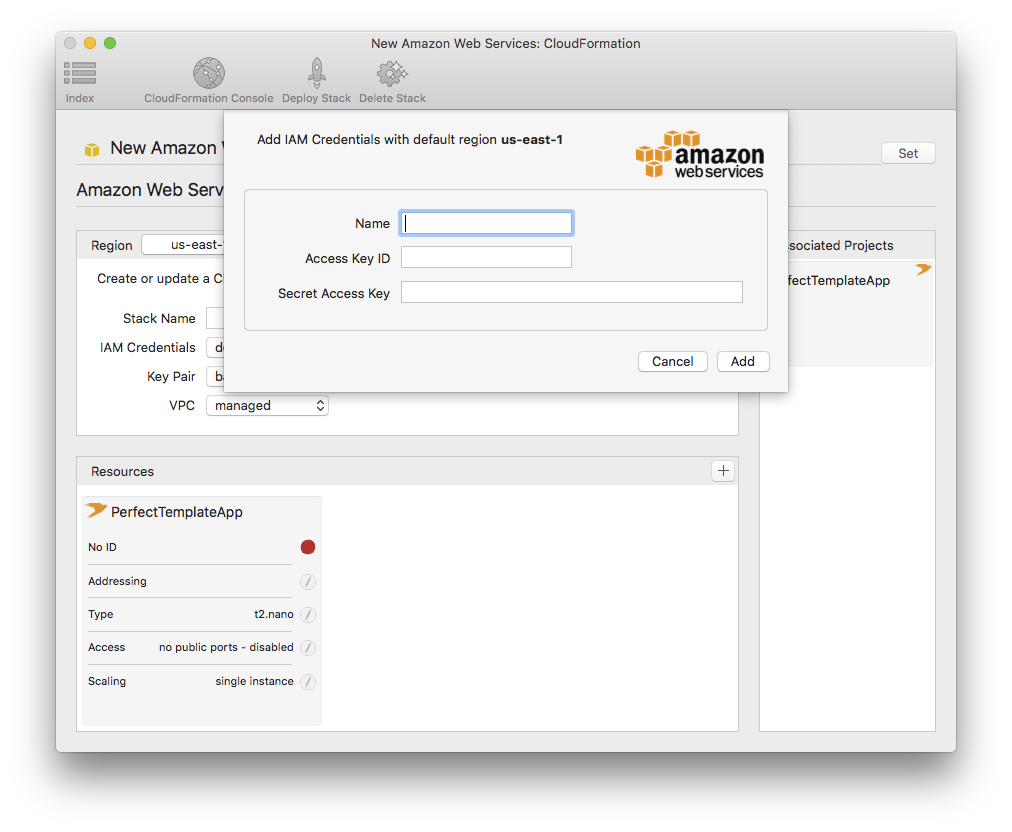
IAM credentials must be obtained from AWS. Any previously entered IAM credentials will be listed in the popup menu. Clicking the "Add…" button next to the popup will bring up a sheet in which you can enter your Access Key ID, Secret Access Key, and a descriptive name for this set of credentials.
Perfect Assistant will read and write to the standard AWS command line tools credentials file. This file is located at "~/.aws/credentials". If you have already entered AWS credentials using these command line tools then you will see then present in the IAM Credentials popup list. Adding new credentials to this list within Perfect Assistant will enable them to be used with these command line tools as well.
Key Pair
A key pair is used to provide administrative access to your instances via ssh. Although enabling ssh access is optional, a key pair is required to be selected for deployment to succeed. Any of your existing key pairs will be listed in the Key Pair popup menu.
The "Add…" button next to the popup menu will bring up a sheet permitting you to create a new key pair or import an existing key pair.
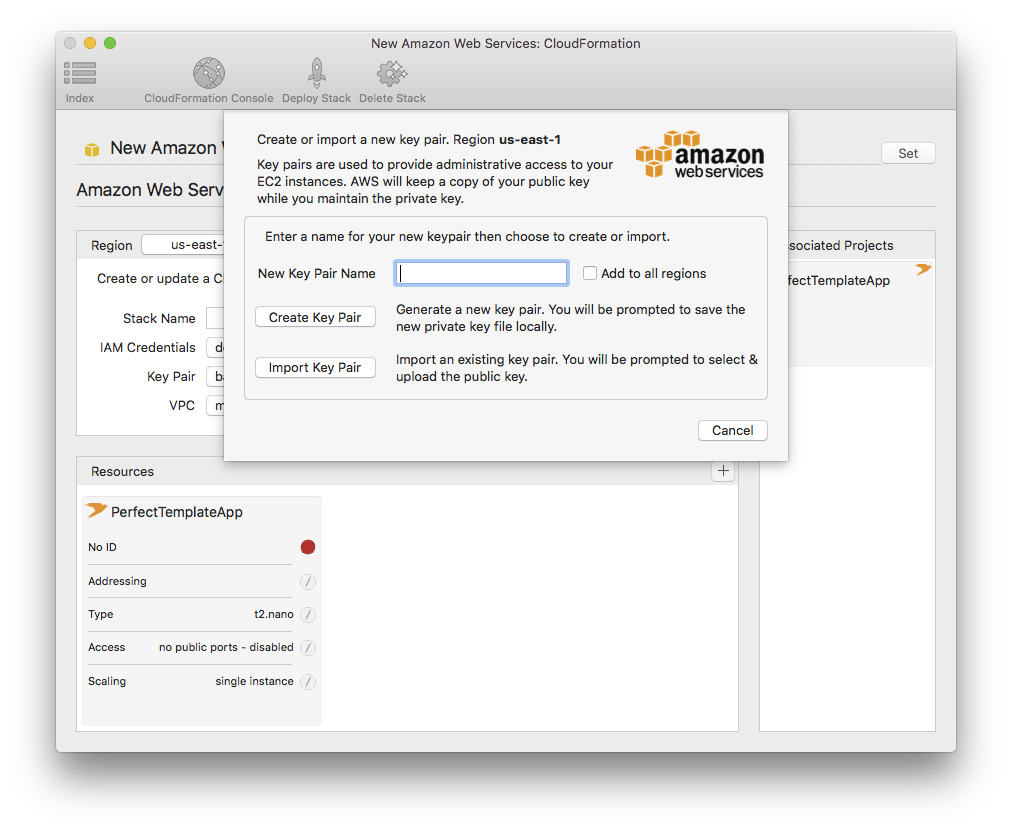
To proceed, you must enter a name for this key pair and then choose to either "Create Key Pair" or to "Import Key Pair".
Create Key Pair will generate a new public/private key. The public key will be sent to AWS and you will be prompted to save the private key file locally. You will need this private key in order to gain access to your instances via ssh. Conventionally, private key files are stored in your "~/.ssh/" directory. The save file dialog which is presented will permit you to select hidden directories. Additionally, regardless of the save location you choose, the private key file will have its permissions set to read/write only for your current user account, as required by ssh.
Import Key Pair will prompt you to select an existing public key file. This file will be sent to AWS while you continue to retain the private key file.
Key pairs which are created or imported are normally region specific, meaning that if you imported a key pair into one region it would not be available in any other region unless it was also explicitly imported there. The "Add to all regions" checkbox next to the key pair name field will address this issue and will copy the newly created/imported key pair into all AWS regions.
VPC
Perfect Assistant CloudFormation deployments are able to automatically create a new VPC (virtual private cloud) and the required public and private subnets for your stack. However, they can also be deployed to any of your existing VPCs. The VPC popup menu will list any existing VPCs as well as the "managed" option.
It is recommended that the VPC be left at the default of "managed". However if you require that your stack be deployed to an existing VPC then it can be selected from the popup menu. If VPC is set to "managed" then a new VPC will be created when the stack is first deployed. Whether the VPC is managed or existing, public and private subnets will be automatically added to the VPC as part of deployment. When the stack is deleted any resources created by the deployment will be automatically removed.
Resources
A resource, in this context, is a Swift server application you have developed, a supporting Swift server app, such as an authentication server, or an RDS database or ElastiCache server. When you associate your projects with a deployment configuration you will see the resulting server in the deployment configuration's resources list. Additional resources can be added to your stack by clicking the "+" button. This will bring up a menu showing the available resources. In this menu you will see options for Redis, Postgres, and MySQL, as well as one or more Swiftlets, which are supporting Swift based servers which may be useful depending on your application.
All of the resources which you have added to your deployment configuration will be deployed along with your stack. Resources can be configured as public or private and these will be placed in automatically created public or private subnets as necessary. Additionally, by adding deployment ports in the Project Editor for your projects you can enable Perfect Assistant to automatically construct a network with security groups permitting only access on the ports you specify.
Each resource type has its own settings and options. Each are described here.
Project Resources
When you associate a project with a CloudFormation deployment configuration, the project's executable target is added as a resource. You will see project related resources listed first in the collection view. These project resource can not be directly deleted as other resources can. To remove a project resource you must un-associate the project from the configuration.
If your project is intended to be publicly accessible then it is important that you set the proper Deploy Ports in the project editor. Public access will only be permitted on the ports you indicate. Make sure you save (⌘-S) the project after making any changes.
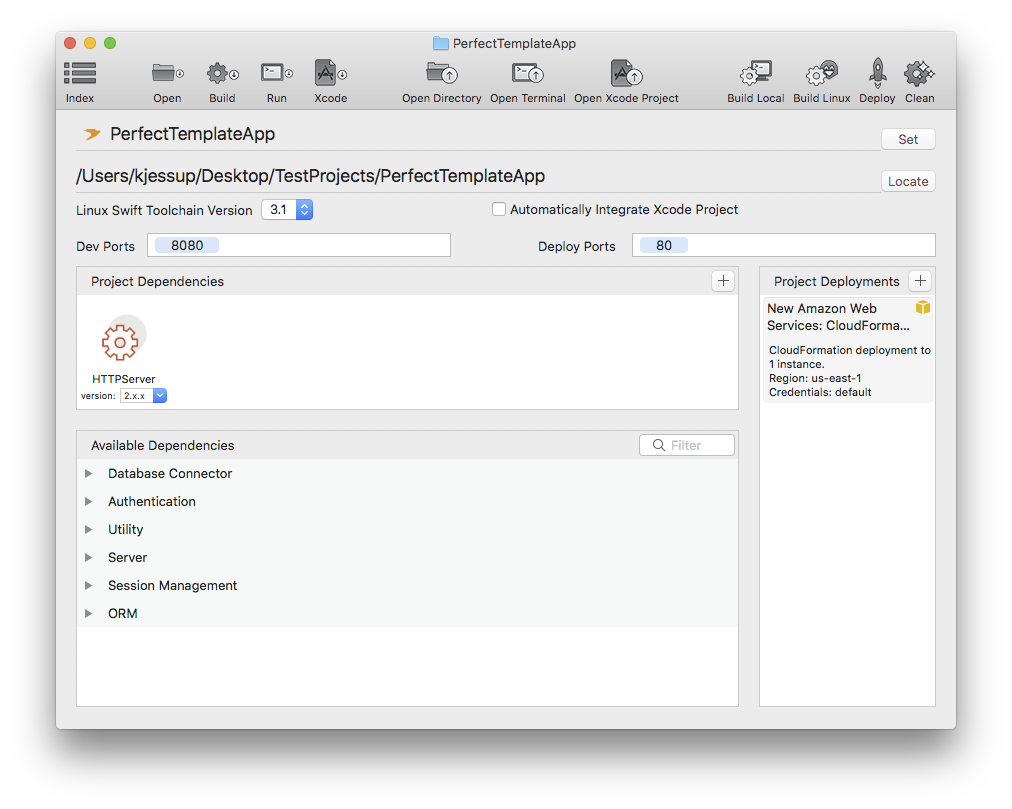
Project Editor with development and deployment ports.
Before a project resource is first deployed it will not have an ID and its status icon will show as red. Once the project has been successfully deployed it will be assigned an ID and the status icon will change to yellow while the instance is starting up and should go green when the instance is fully up and running.
A project resource item contains various settings and options. Each option can be accessed by clicking the edit icon to the right of the title. These options are grouped into the following categories:
Addressing - Permits control of Elastic IP creation and assignment.
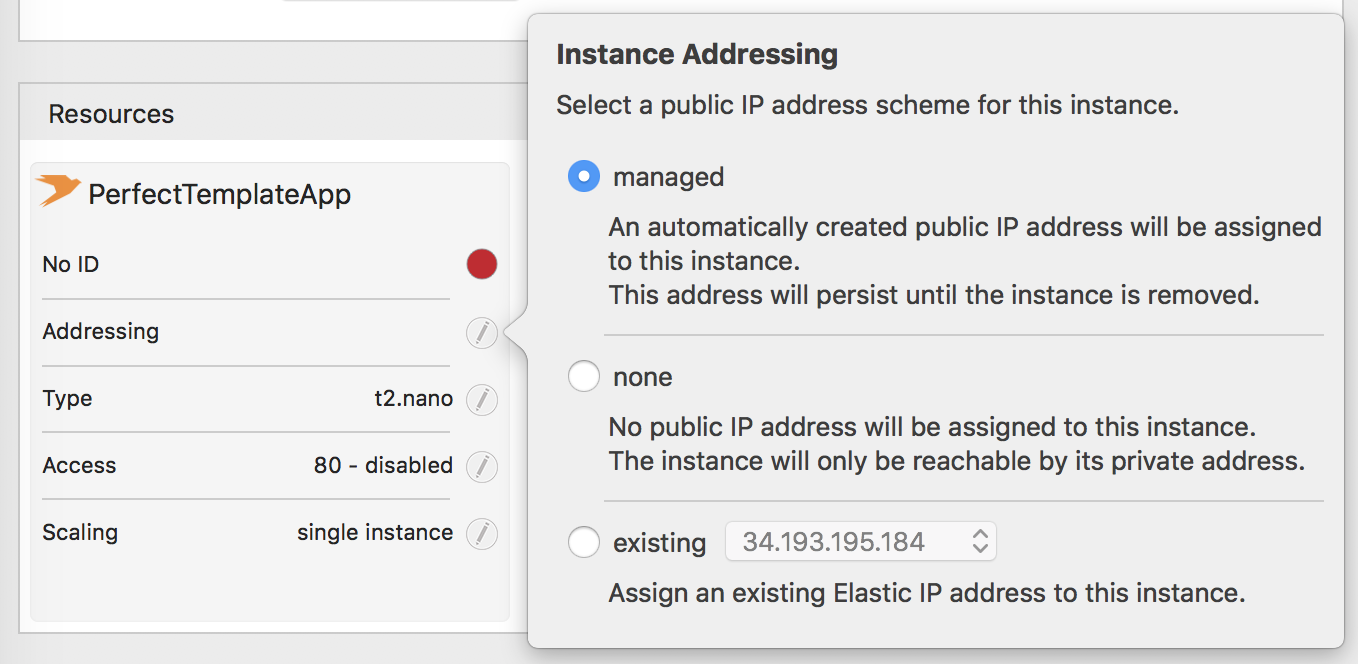
Any existing Elastic IP addresses will appear in the "existing" popup menu.
Type - Permits control of the instance size.

This popup menu will include any valid AWS EC2 instance size.
Access - Disables or enables SSH access for one or more source IP addresses.
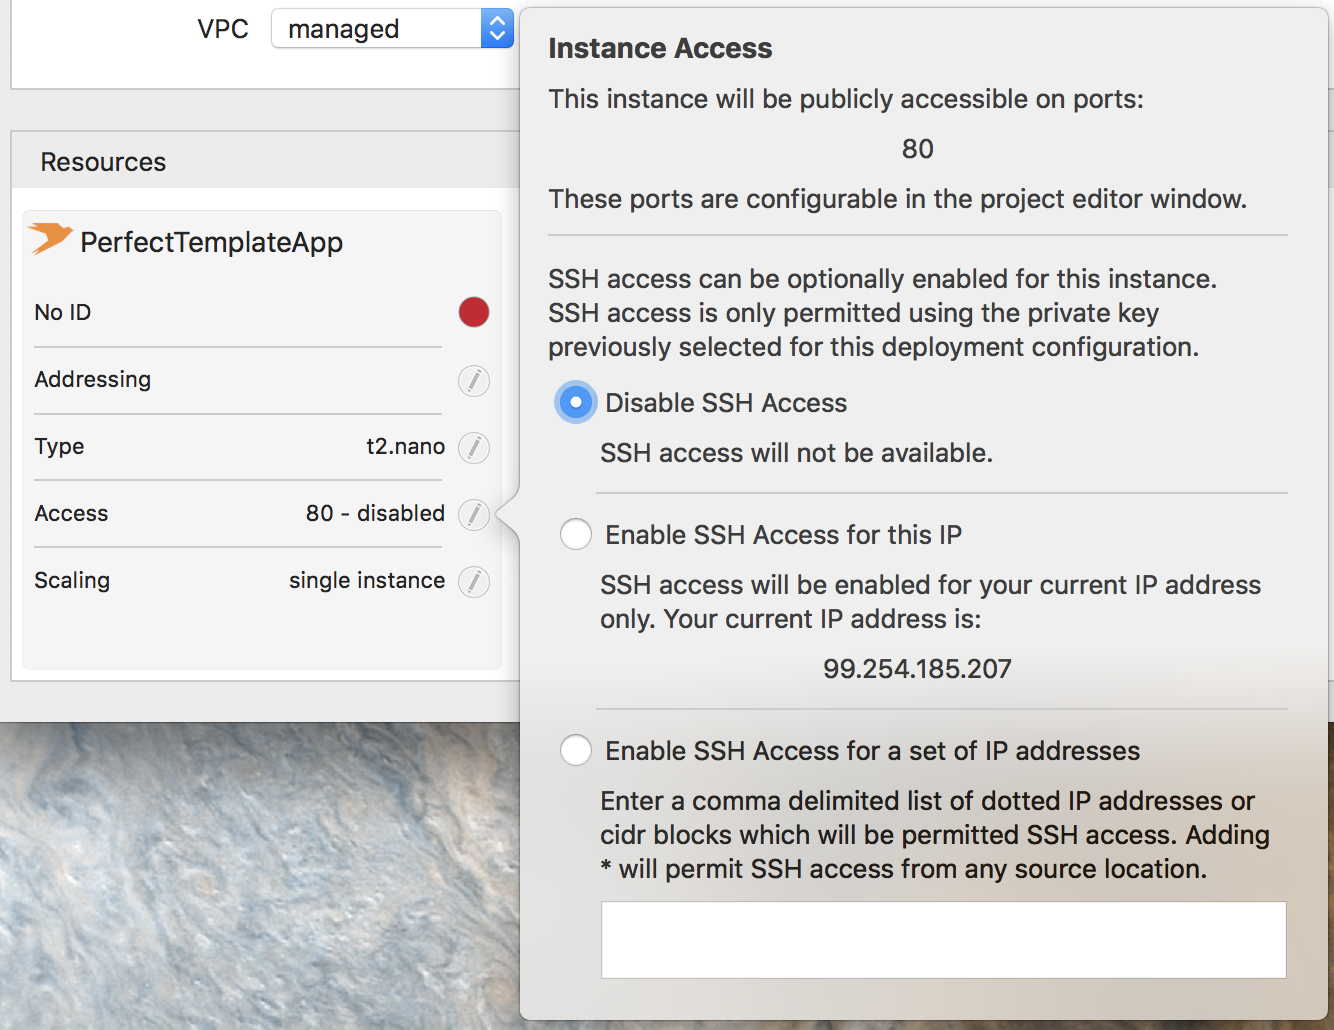
SSH access is disabled by default.
Scaling - Enables auto-scaling via a load balancer. Also permits selection of an ACM SSL certificate for the load balancer.

Enabling auto-scaling will, instead of creating one server instance, create an Application Load Balancer with one or more server instances behind it. The load balancer will spin up new instances as load demands.
The "minimum size" and "maximum size" settings will control the min/max number of running instances that the load balancer will launch. Perfect Assistant will create two public subnets and two private subnets in randomly selected availability zones within the selected region. This min/max applies to each subnet. So if, for example, a minimum of one instance is specified then the load balancer will launch one instance in each public (or private, if no public access is permitted) subnet. Therefore, the server would always have at least two instances running. This protects not only against application failures but also against hardward failures in the AWS datacenters. Placing servers in different availability zones ensures that not all server instances are running on the same physical hardware.
The load balancer will occasionally make a request to "/" on your server in order to gauge responsiveness. If responsiveness is seen to be degrading, or the server is inaccessible, additional instances will be launched up to your max size setting. As responsiveness improves, previously launched instances will be shut down, down to your min size setting. Additionally, the load balancer will utilize "sticky sessions", which will try and direct individual clients to the same server when possible.
Once the load balancer is successfully deployed it will be assigned an AWS specific public domain name. In order to use your own domain name you will need to add a CNAME for your domain mapping to this AWS domain name. This AWS domain name will be shown in these same "Scaling" settings after deployment.
The load balancer supports TLS certificates created through or registered with ACM (Amazon Certificate Manager). Any such certificates will be shown in the "TLS Certificate Manager" popup menu. These certificates are only available if load balancing is enabled. When using this facility, your server should listen on only one port, generally port 80. It should not listen on port 443 as one would normally when not using a load balancer. The load balancer will listen on port 443 and forward all requests to the destination server.
Swiftlet Resources
A Swiftlet is a ready-made server intended to be deployed to serve along side your other instances for utility purposes. Examples would include things like an authentication server or a server log aggregator. The list of available Swiftlets is presented in the "add resource" popup menu.

Perfect Auth Server Swiftlet in the add-resource menu.
A Swiftlet will commonly have other dependencies; for example, an RDS database requirement. In this case, adding a Swiftlet will automatically add the other required resources. Swiftlets have all of the same configurable settings as a normal project resource. Refer to the documentation above when customizing a Swiftlet server. In addition, Swiftlets may have a series of options which can be configured. The Perfect Auth Server, for example, permits configuration of the various keys used to communicate with external services.
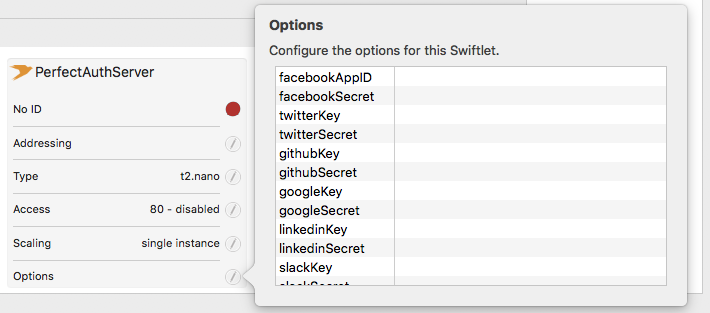
Perfect Auth Server Swiftlet options.
To remove a Swiftlet, select the item and press the delete or backspace key. When making any changes you must save (⌘-S) for the changes to take effect.
RDS Resources
The "add resource" menu can be used to add RDS instances to your stack. Perfect Assistant currently supports PostgreSQL and MySQL RDS instances. Once an RDS instance has been added to your stack's resources you can edit the various options. The options are the same regardless of the database type. These options are grouped into the following categories:
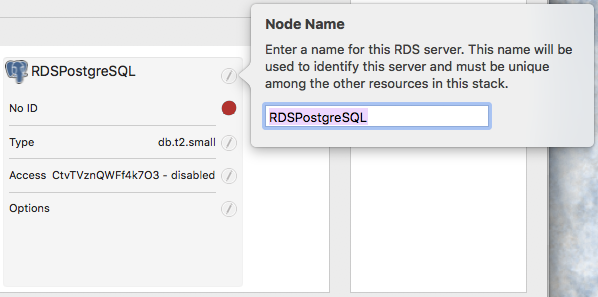
Resource Name - Each resource in your stack must have a unique name. RDS instances automatically get a default name, but you can set the name to whatever you wish, provided it has no special characters. Resource names should begin with an alphabetic character and can contain only letters and numbers. Changing a resource name after the resource has been deployed will remove the existing instances and deploy a new one.
Type - Permits control of the database instance size.

This popup menu will include any valid AWS RDS instance size.
Access - Permits setting the database's username, password, and port. Also permits opening the instance up for public access for one or more IP addresses.
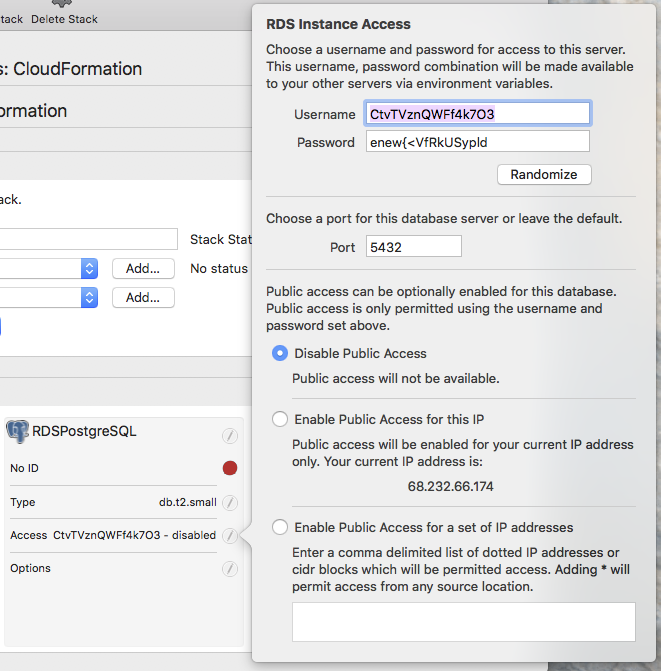
Public access is disabled by default. RDS resources will automatically get a randomized username and password.
To remove an RDS resource, select the item and press the delete or backspace key. When making any changes you must save (⌘-S) for the changes to take effect.
ElastiCache Resources
Perfect Assistant currently supports only Redis ElastiCache instances. Once a Redis resource has been added to your stack you can configure the options. These options are grouped into the following categories:
Resource Name - Each resource in your stack must have a unique name. ElastiCache instances automatically get a default name, but you can set the name to whatever you wish, provided it has no special characters. Resource names should begin with an alphabetic character and can contain only letters and numbers. Changing a resource name after the resource has been deployed will remove the existing instances and deploy a new one.

Type - Permits control of the cache instance size.
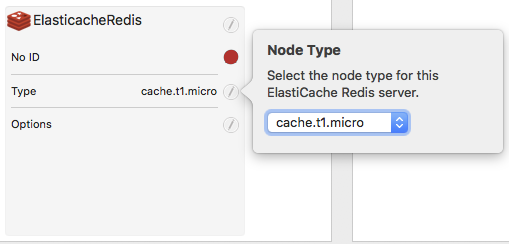
This popup menu will include any valid AWS ElastiCache instance size.
To remove an ElastiCache resource, select the item and press the delete or backspace key. When making any changes you must save (⌘-S) for the changes to take effect.
Connection Variables
When your stack is deployed all of the other resource connection variables, including host name, port, username, and password, are published and made available to the other servers in the stack. You can easily access these values by using the Perfect-CloudFormation package. This package is designed to be simple, lightweight, and to work with any of the supported Swift server frameworks. You can add it to your app by including it as a dependency in your Package.swift file.
.Package(url: "https://github.com/PerfectlySoft/Perfect-CloudFormation.git", majorVersion: 0)
This package provides three different interfaces. These permit enumeration of the RDS, ElastiCache, and Swiftlet instances in your stack.
List RDS Instances
public enum CloudFormation {
	public struct RDSInstance {
		public enum DBType {
			case postgres, mysql
		}
		public let resourceType: DBType
		public let resourceId: String
		public let resourceName: String
		public let userName: String
		public let password: String
		public let hostName: String
		public let hostPort: Int
	}
}

public extension CloudFormation {
	static func listRDSInstances() -> [RDSInstance]
	static func listRDSInstances(type: RDSInstance.DBType) -> [RDSInstance]
}
By using the "listRDSInstances" functions your app can get the connection information for all RDS instance or for instances of a particular type.
List ElastiCache Instances
public enum CloudFormation {
	public struct ElastiCacheInstance {
		public enum ElastiCacheType {
			case redis
		}
		public let resourceType: ElastiCacheType
		public let resourceId: String
		public let resourceName: String
		public let hostName: String
		public let hostPort: Int
	}
}

public extension CloudFormation {
	static func listElastiCacheInstances() -> [ElastiCacheInstance]
	static func listElastiCacheInstances(type: ElastiCacheInstance.ElastiCacheType) -> [ElastiCacheInstance]
}
By using the "listElastiCacheInstances" functions your app can get the connection information for all cache servers or for instances of a particular type. NOTE: Only Redis is supported at this time.
List Swiftlet Instances
public enum CloudFormation {
	public struct SwiftletInstance {
		public let resourceId: String
		public let resourceName: String
		public let hostName: String
		public let hostPorts: [Int]
	}
}

public extension CloudFormation {
	static func listSwiftlets() -> [SwiftletInstance]
}
By using the "listSwiftlets" functions your app can get the connection information for all Swiftlet servers. The semantics for connecting to a Swiftlet server and its usage will vary on a case by case basis. Refer to the associated documentation for each Swiftlet for further details.
Deploying Stacks
Once you have configured and added your projects and any other resources to the stack, clicking the "Deploy" button in the toolbar will begin the deployment process. All of the resources in the stack will be deployed at once. The Perfect Assistant Tasks window will open and provide feedback for the local steps which are performed. This will involve building each of your associated projects and Swiftlets for Linux in release mode. Each of these builds will be performed simultaneously. As each build completes the resulting binaries and other files will be copied to an S3 bucket on your account. The bucket name will begin with "perfect-deployed" followed by a short random sequence of characters. Artifacts for all stack deployments will be placed in this bucket in sub-directories named after the individual stacks themselves. Perfect Assistant will then craft a CloudFormation template and send a request to AWS to deploy that stack template. You will find this template in the deployment bucket along with the other build products.
Once this deployment request has been sent to AWS you can view the deployment status in brief within the deployment configuration window. For a detailed status report, clicking the "CloudFormation Console" toolbar button will open a browser window to the CloudFormation stack detail page. Once deployment has successfully completed the stack status should read "CREATE_COMPLETE".
Note that deployment can take several minutes depending on the resources involved in the stack. While a simple one-app stack may take only a couple of minutes for an initial deployment, stacks with RDS instances may take up to 20 minutes, so please be patient. If you see that a deployment has failed after sending the request to AWS, opening the CloudFormation Console will provide information on whatever problem may have caused the failure.
Once the resources have been created on the AWS servers the status indicators in the deployment configuration window will show the status for each item. It may take several minutes for server instances to fully deploy and come to a usable state. Various labels in the resource "squares" will become links to either the server itself, as in the case of clicking one of the blue port numbers, or to the console page for the resource on the AWS site.
A project resource before and after successful deployment:
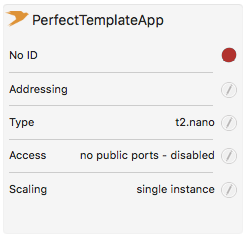
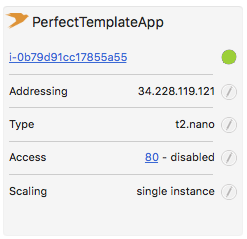
Click the resource id will open the AWS console page for that resource. Clicking the port number will open the server itself on the indicated port.
Updating Stacks
When some component of your stack changes or you adjust a resource's settings, the stack will need to be re-deployed. Clicking the "Deploy Stack" button will perform an update if the stack had been previously successfully deployed. Only aspects of the stack which have changed will be modified. For example, if you need to re-deploy your application because of a code change, any other resources, such as RDS instances, will be unmodified and remain uninterrupted.
Normal re-deployments due to code changes tend to happen fairly quickly. However, note that each Swift server instance will poll for updates every two minutes, so it may take up to that amount of time for changes to become evident.
Changes to an instance's type/size will require shutting down the existing instance and deploying a new version.
Once a stack update has completed successfully, the stack status should be "UPDATE_COMPLETE".
Deleting Stacks
Clicking the "Delete Stack" toolbar button will, after prompting you for confirmation, begin removing all resources which were created as part of the initial deployment. This includes any instances, managed Elastic IP addresses, the managed VPC, and the created subnets. Nothing from the stack deployment will be left behind with the exception of a database snapshot performed for each RDS instance in the now defunct stack. These snapshots can be manually deleted as needed.